
The setup of Zend and Doctrine should now be finalized and ready to go. So let’s create our Blog module.
To do this we’re going to use the MVC (Model/View/Controller) pattern. We’re also going to apply separation of concerns.
Directory structure
Start by creating a folder and file structure next to the Application folder in the /module folder.
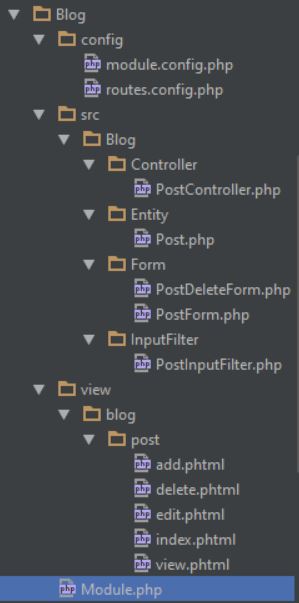
You should be able to discern what we’re going to create based just on the file/folder structure. We’re going to setup the CRUD actions for creating posts for a blog. For this we would need a Model of a post, or, in our case, a Post entity. To create and edit posts we would need Forms. To delete we could use the same form, but we don’t need much of what the PostForm will contain, so we’re going to use a separate PostDeleteForm.
When creating the functionality, which is the next task , we will come across functionality that would be useful to have available globally, for all entities, controllers, forms or forms.
Mind you, it seems like we have to configure a lot, and still we’ve got no result to show. Well, we’re nearly at the point where we can start seeing the results of our labour. There are just two more things to do before this will happen We’ve got to configure the application to recognise and use the Blog module and setup our Entity (model). After having done this we start to see magic happen.
Configure the blog module
In the root of the module (/module/Blog), Zend Framework expects to find a file (Module.php)
which contains the configuration for that specific module. Following Zend tutorials you’ll see that they show all
configuration to be done in this one file. However, this file doesn’t follow the principle of separating concerns. Thus
we better do this in a more organised fashion.
Open up your Module.php and copy in the following code.
1
2
3
4
5
6
7
8
9
10
11
12
13
14
15
16
17
18
19
20
21
22
23
24
25
26
27
28
29
30
31
32
33
34
35
namespace Blog;

use Blog\Entity\Post;
use Zend\Stdlib\ArrayUtils;

class Module
{
    public function getConfig()
    {
        $config = [];

        $configFiles = [
            __DIR__ . '/config/module.config.php',
            __DIR__ . '/config/routes.config.php',
        ];

        // Merge all module config options
        foreach ($configFiles as $configFile) {
            $config = ArrayUtils::merge($config, include $configFile);
        }

        return $config;
    }

    public function getAutoloaderConfig()
    {
        return [
            'Zend\Loader\StandardAutoloader' => [
                'namespaces' => [
                    __NAMESPACE__ => __DIR__ . '/src/' . __NAMESPACE__,
                ],
            ],
        ];
    }
}
If you look closely at this code you’ll notice that it’s pretty generic. The purpose of this is you can easily copy and paste contents into any future module you might create without having to rethink it.
The functions all have specific names, so please do not change these names. Zend expects these functions to be here for
the specific purposes their name suggests. The implementation however, may vary. The Zend tutorials for example have the
getConfig() function containing an array. In contrast, we include some configuration files and then merge them into an
array to be returned. Thus we separate the configuration into documents, each covering a concern.
Load the module into the application
Next up, quickly jump back to the application.config.php file. Even though files for the Blog module are present, Zend
will not use it until it’s told to include it’s configuration. For this we need to add an entry where we added the
Doctrine modules earlier.
Modify the modules array part in /config/application.config.php to the following:
1
2
3
4
5
6
'modules' => [
    'Application',
    'DoctrineModule',
    'DoctrineORMModule',
    'Blog',
],
Configure the module
We’re now getting closer to seeing results. If you refresh you browser now, you’ll find that you see an error about the
merge() function not getting an array. Remember the config files you included in the Module.php file in the Blog module?
Right, these are still empty. Let’s put some information into these now so we can start creating the Entity we will be
using and create an index page.
Open up /module/Blog/config/module.config.php and copy in the following code:
1
2
3
4
5
6
7
8
9
10
11
12
13
14
15
16
17
18
19
20
21
22
23
24
25
26
27
28
29
30
31
namespace Blog; //Used for Doctrine path

return [
    'controllers'  => [
        'invokables' => [
            'Blog\\Controller\\Post' => 'Blog\\Controller\\PostController',
        ],
    ],
    'doctrine'        => [
        'driver' => [
            __NAMESPACE__ . '_driver' => [
                'class' => 'Doctrine\ORM\Mapping\Driver\AnnotationDriver',
                'cache' => 'array',
                'paths' => [
                    __DIR__ . DIRECTORY_SEPARATOR . '..' . DIRECTORY_SEPARATOR . 'src'
                    . DIRECTORY_SEPARATOR . __NAMESPACE__ . DIRECTORY_SEPARATOR . 'Entity',
                ]
            ],
            'orm_default'             => [
                'drivers' => [
                    __NAMESPACE__ . '\Entity' => __NAMESPACE__ . '_driver'
                ],
            ],
        ],
    ],
    'view_manager' => [
        'template_path_stack' => [
            __DIR__ . DIRECTORY_SEPARATOR . '..' . DIRECTORY_SEPARATOR . 'view',
        ],
    ],
];
Alright. That wasn’t so much. Let’s have a quick look.
Firstly, we seem to be using the namespace Blog in this file. This is because we use the __NAMESPACE__ global
variable in the configuration, thus it needs to be present in the file. We could replace __NAMESPACE__ with Blog and
not have a problem. But now we can copy and paste this configuration into the next module.
We then return the array with the configuration for the module. In here we declare the controllers this module has
available. These are ‘invokables’ and can be called using the name without Controller at the end of them. Why not name
the PostController just Post instead? This is a convention and it’s a good habit to get in to. Just as callable
functions within the controller will have “Action” attached to their names. But we’ll get to these soon… very soon.
Then we do more configuring for Doctrine. (Hadn’t we finished with that? Sorry, no). Again this is done as generic as
possible. Earlier we did do some configuration for Doctrine, but that was just making sure that Doctrine would be able
to use the database. Doctrine itself uses a Manager (the EntityManager) to manage its entities. To be able to use an
Entity it needs to know what driver to use. We could deposit all of our entities in a single folder (for example in
/module/Application/Entity) and add this configuration to the containing module to run all of the entities. However,
this would pollute that folder and also not contain our module to just its own folder, therefore that’s a bad practice
to get into. It makes entities you are looking for hard to find. Better to do the following to keep everything tidy.
Also, having multiple drivers, one for each entity, is perfectly fine. Doctrine’s EntityManager will keep track of these
and select the one required when we need it to. Even if you deposit all of the entities into a single folder, Doctrine
will create a driver for each Entity declared.
Lastly we do some configuration to let Zend know where to find the views for this module. Again this shouldn’t be very surprising to read.
Adding your first route
Now we have just a small bit of configuration to go and then we’ll start creating the entity followed by the index and
other pages and functionality. Please open up /module/Blog/config/routes.config.php and copy in the following code:
1
2
3
4
5
6
7
8
9
10
11
12
13
14
15
16
17
18
19
20
return [
    'router' => [
        'routes' => [
            //routeName: blog
            //route: /blog
            'blog' => [
                'type'          => 'Literal',
                'may_terminate' => true,
                'options'       => [
                    'route'    => '/blog',
                'defaults' => [
                    'module'     => 'Blog',
                    'controller' => 'Blog\\Controller\\Post',
                    'action'     => 'index',
                    ],
                ],
            ],
        ],
    ],
];
To conclude
As you can see this wasn’t much at all. In this file we set up the routing that will be available for the Blog module.
We hook this configuration into Zends routes configuration, created for the router (note the slight difference in
words, that’s important 😉 ). I’ve also included comments to highlight for you the routeName and the route. The
difference between these is that in you’re code you can call a routeName to generate a link but the client (or
browser) will show the route.
The remainder of the configuration for this route tells Zend what type of route (Literal), if it may_terminate, or
break off here if it matches the current URL, and which module, controller and action to execute if it finds a match.
Later on we will be adding more routes for our other functions which also include parameter handling and child-routes.